Academy
AIrDAO Node setup guide
Thanks to the latest AirDAO website version, becoming a node validator and setting up your AirDAO node has never been simpler! This comprehensive guide will walk you through setting up Apollo nodes using the Digital Ocean.
Changes description
Previously, all node installation and management tasks were centralized in the command line. Now, the entire process of launching and operating nodes has been split into two stages:
- Managing addresses and funds is done through the AirDAO website.
- Managing the node server is handled through the command line.
This change was implemented to improve the security of our validators, ensure the network’s stability, and safeguard our users’ funds. Additionally, it has made launching and managing nodes more user-friendly and accessible, making the concept of running an AirDAO node even more appealing!
Part 1. Setting up the node via the AirDAO website
Step 1: Specify Your Node Address
Visit https://airdao.io/explorer/node-setup/, link your MetaMask wallet for node setup via “Connect wallet” button, and select the AirDAO network.
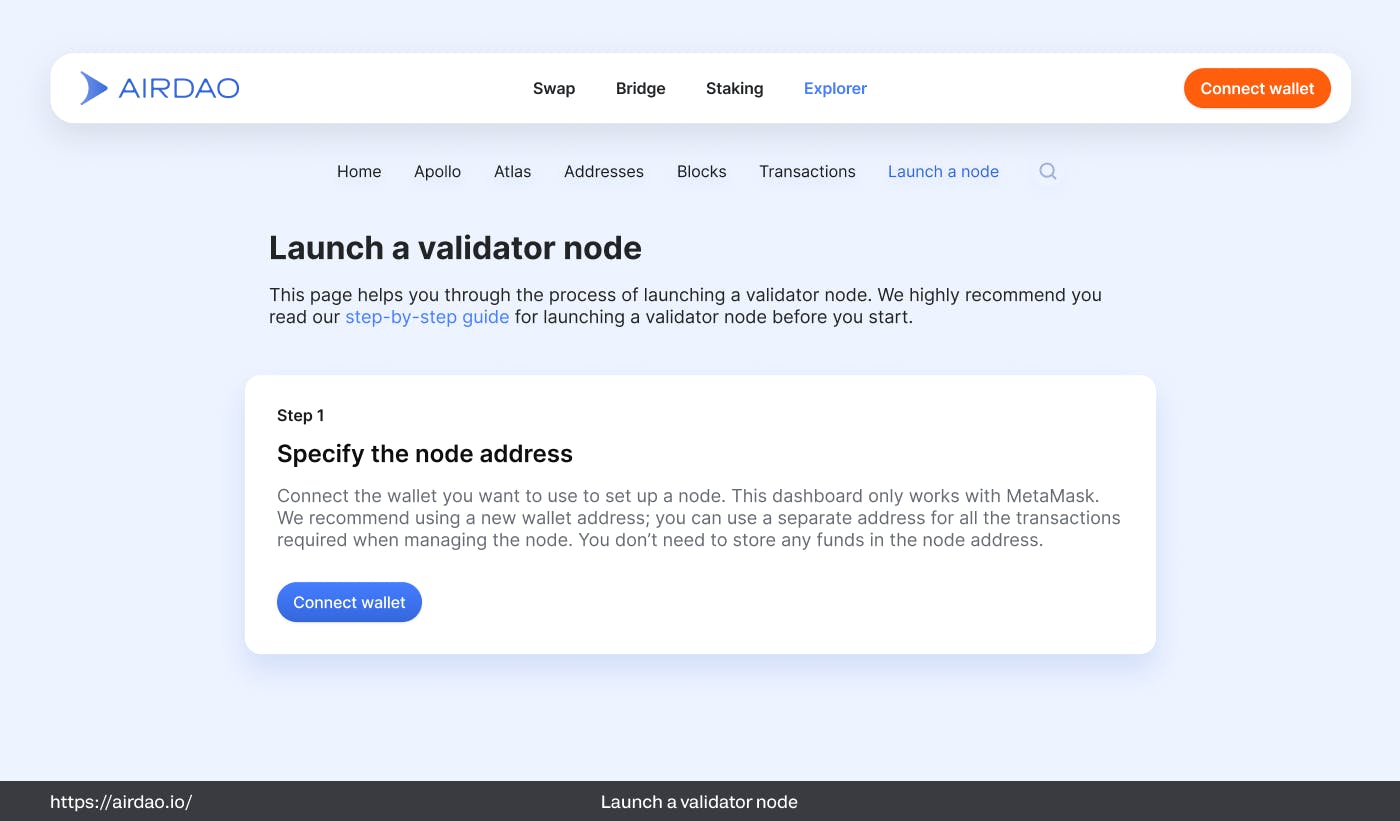
Consider generating a new wallet address as your second step for increased security. You can use a separate address for all node transactions, eliminating the necessity to hold funds in the node address.
Once the node is initiated, the Apollo nodes list on the website will display the chosen “Node Address.”
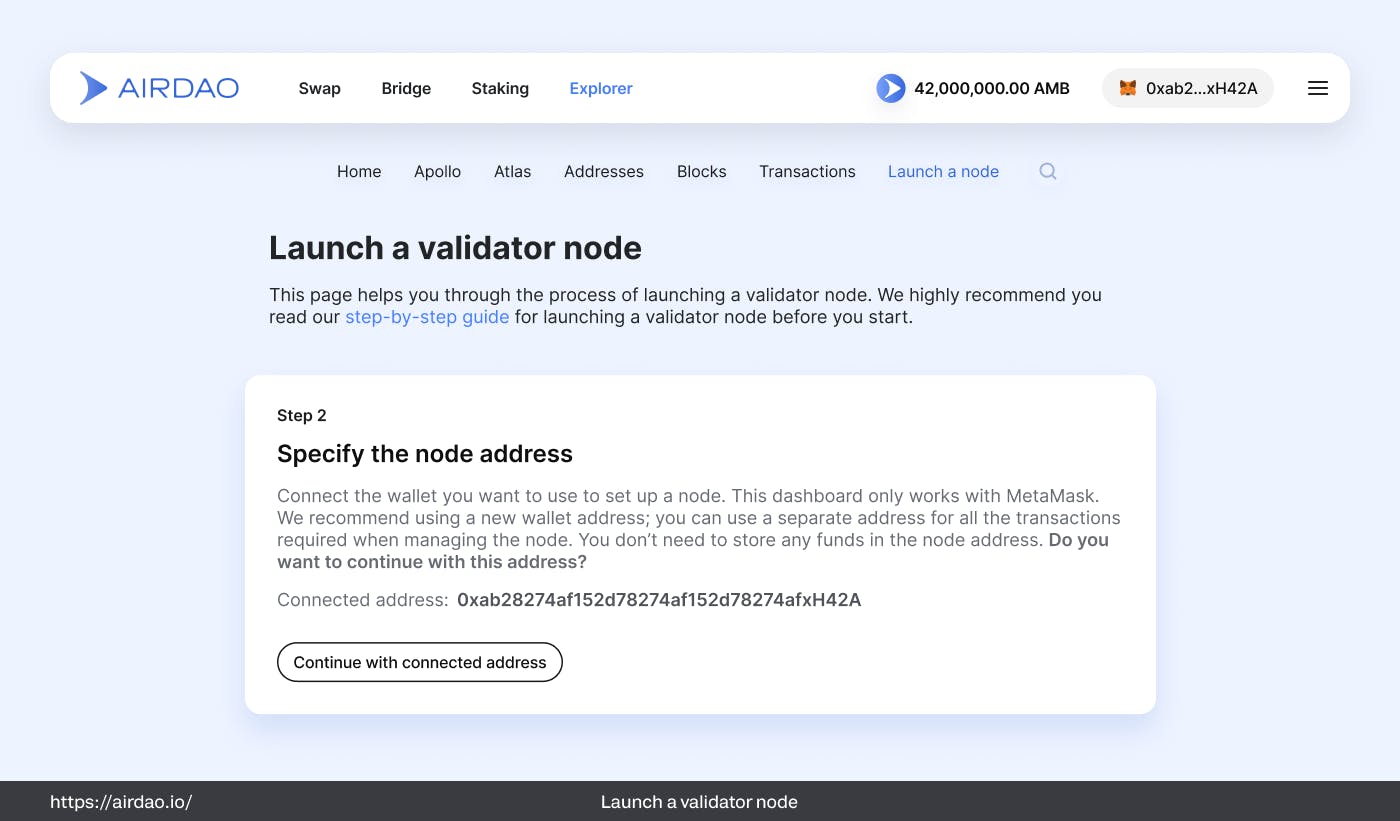
Step 2: Define the Node Owner Address
For increased security, selecting a separate wallet address for managing your node is advisable. “Node Owner” can manage several nodes at the same time.
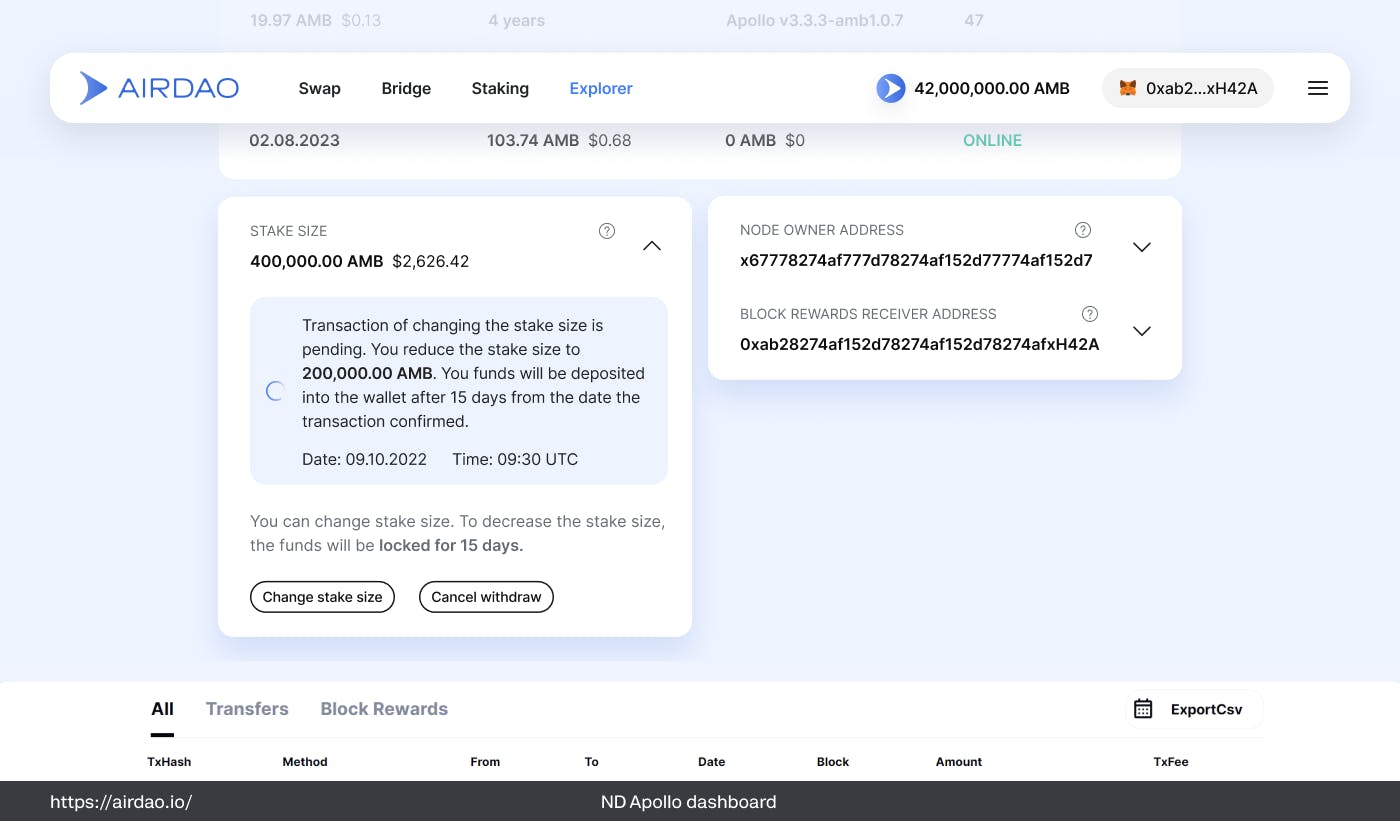
You can also modify the node owner address on the dashboard page. Simply ensure you’re using the Node Owner’s address in your MetaMask wallet. Visit https://airdao.io/explorer/apollo/ and find your node in the list. Opening the node will reveal an additional menu, providing you with management options.

Kindly note that the transaction to deduct AMB for launching the node will originate from this address. Furthermore, it’s essential to recognize that a single Node owner can manage multiple nodes, each assigned a different node address.
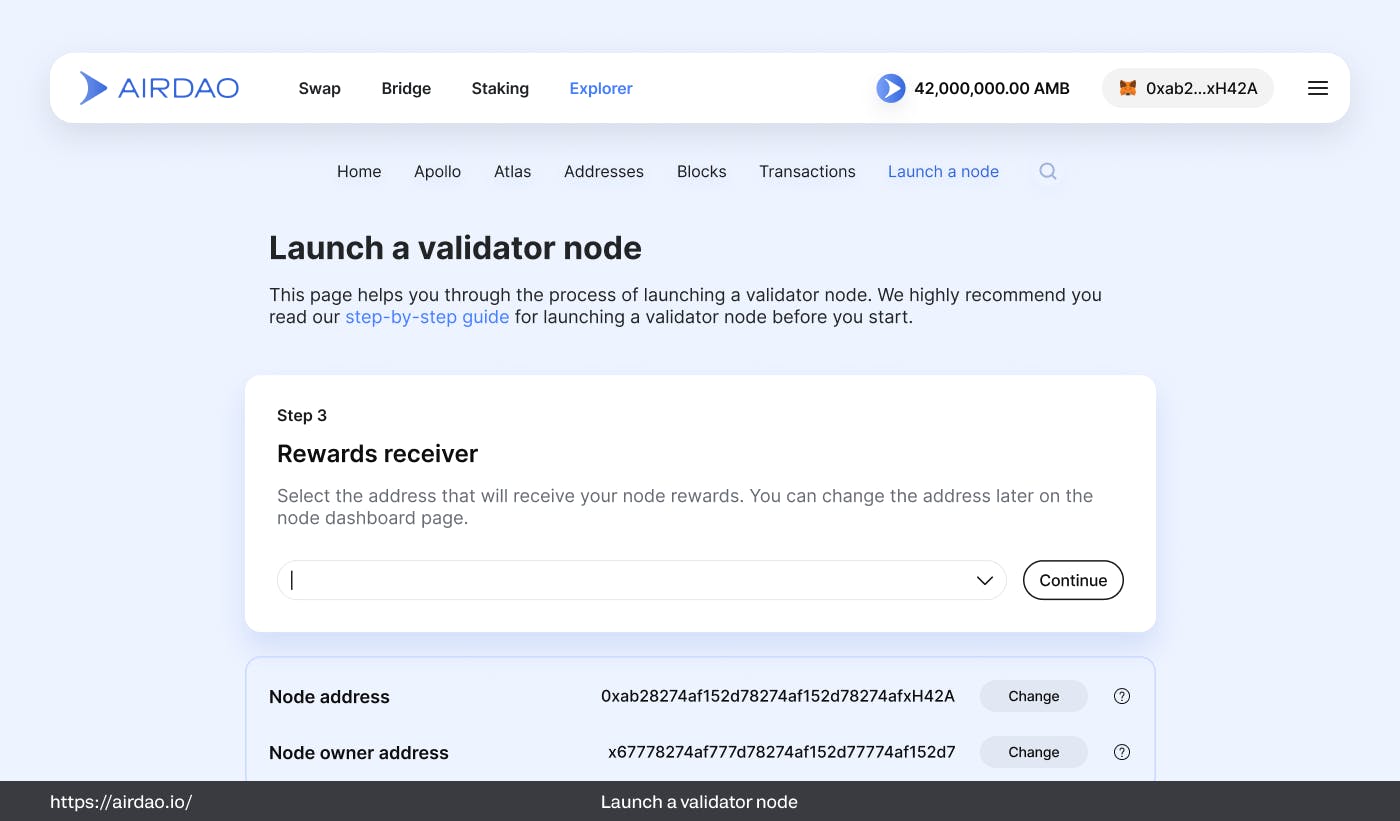
Step 3: Choose the Rewards Receiver
Designate the address where your node rewards will be received. It can be another wallet address or a Node Owner address. Utilize the dropdown button to select the addresses chosen in the preceding steps. You will have the flexibility to update this address later via the node dashboard.
Step 4: Determine Your Node’s Stake Size
Specify the quantity of AMB you wish to stake. Node rewards are dynamic and contingent on the staked AMB amount.
Notice that the minimum staking position size is specified in the “input” field, and you must enter a value not lower than the specified amount. Additionally, when entering the amount, ensure that the “Node Owner” is chosen in MetaMask.
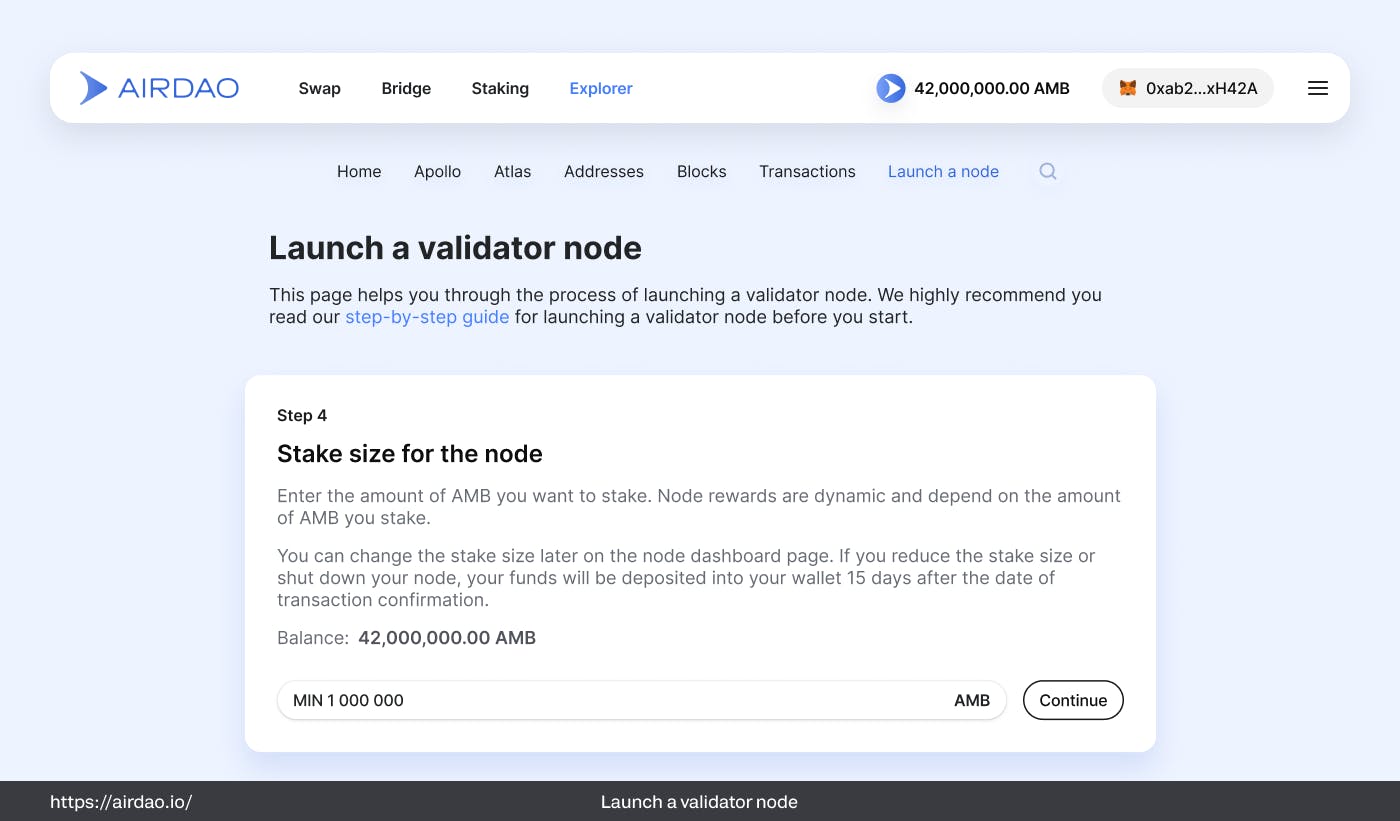
You can adjust the stake size later on the node dashboard. If you reduce the stake size or retire your node, your funds will be returned to your wallet 15 days after the transaction confirmation.
Please note that not all active nodes will participate in blockchain validation and receive rewards. The AirDAO Council will decide the specific number of validating nodes in the blockchain, and this number may be subject to change in the future. To increase the likelihood of your node becoming a validator, please review the nodes list and ensure that your stake size is significant enough to rank among the top nodes with the largest stake size. Nodes with smaller stake sizes may be placed on a waiting list. If your stake size is insufficient for running a node, consider the AMB Staking program as an alternative.
You will be directed to a page displaying the provided information upon confirming the node launch amount. Here, you can review the details, modify pre-established addresses by selecting the “change” button, and, if necessary, return to the previous steps.
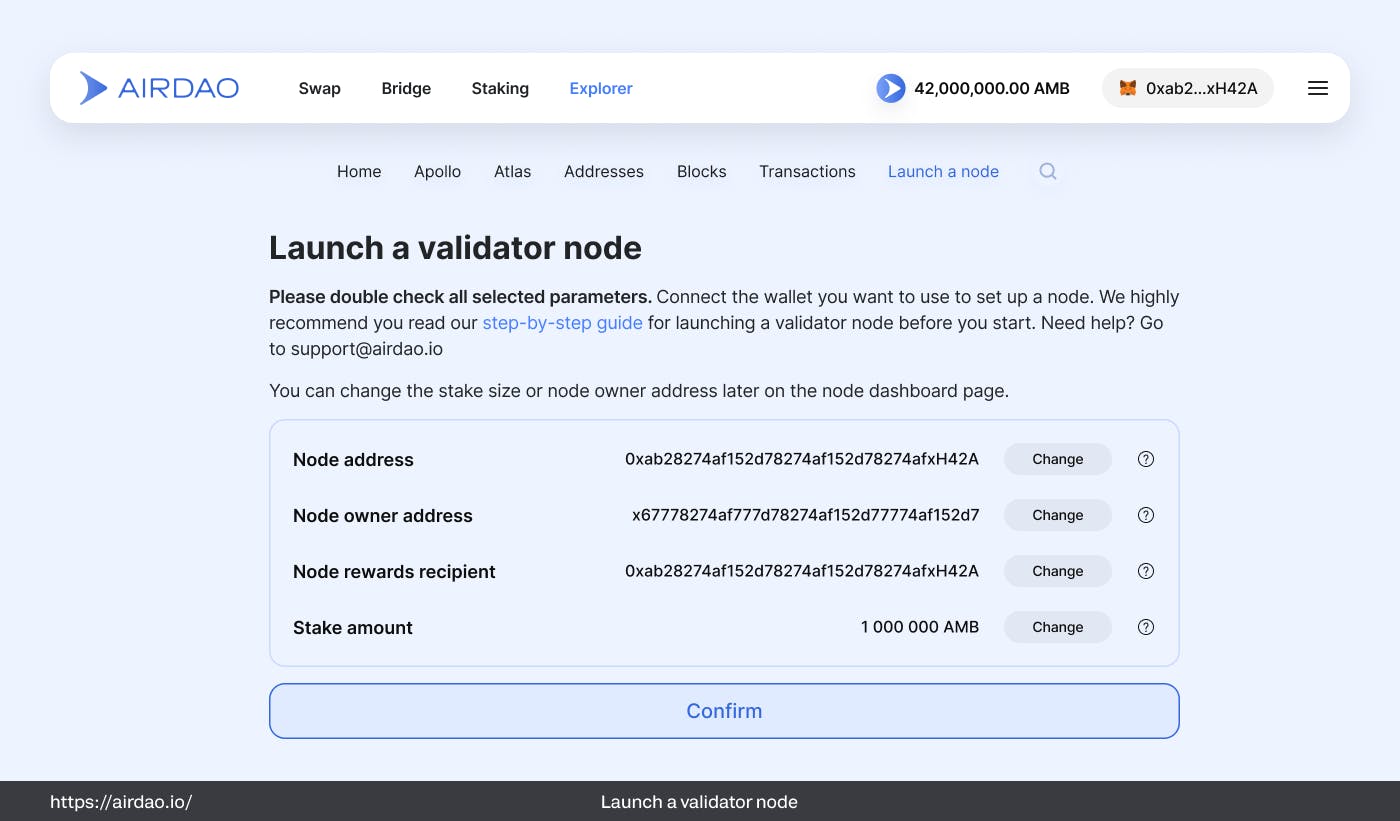
Please note that the transaction to debit the specified amount for launching the node will be executed from the node owner’s address. Therefore, it’s crucial to ensure that:
- Sufficient AMB is available at this address;
- This address is selected and accessible in your Metamask wallet at this stage.
Failure to meet these conditions may result in the transaction being canceled.
Once the transaction is successfully completed, you will receive a confirmation and the command required to initiate the node on the VPS server.
Command to launch the node:
source <(curl -s https://raw.githubusercontent.com/ascendia-network/airdao-nop/master/setup.sh)
Part 2. Setting up the VPS server & activating the node
What is a Virtual Private Server (VPS)?
A Virtual Private Server offers users the unique ability to operate their server within a shared physical infrastructure. To illustrate, envision it as securing an office space in a vast building. You own the space and can tailor it to our specific requirements, yet other individuals collectively use the building.
The term “Virtual Private Server” is aptly named because it relies on virtualization technology, enabling the host, in our case, DigitalOcean, to partition a single server into multiple distinct ones. The attribute “private” indicates that the server is exclusively accessible by you, and resources, like RAM, CPU, and storage, are allocated solely to your server, as defined during the VPS setup.
Why should we use a VPS?
Our VPS serves as the hub for setting up and operating our node. Instead of running nodes on our personal desktop machines, leveraging a VPS provides numerous advantages, including robust availability, simplified setup and configuration, and potential for future expansion and scalability.
Step 5: Setup a DigitalOcean Droplet
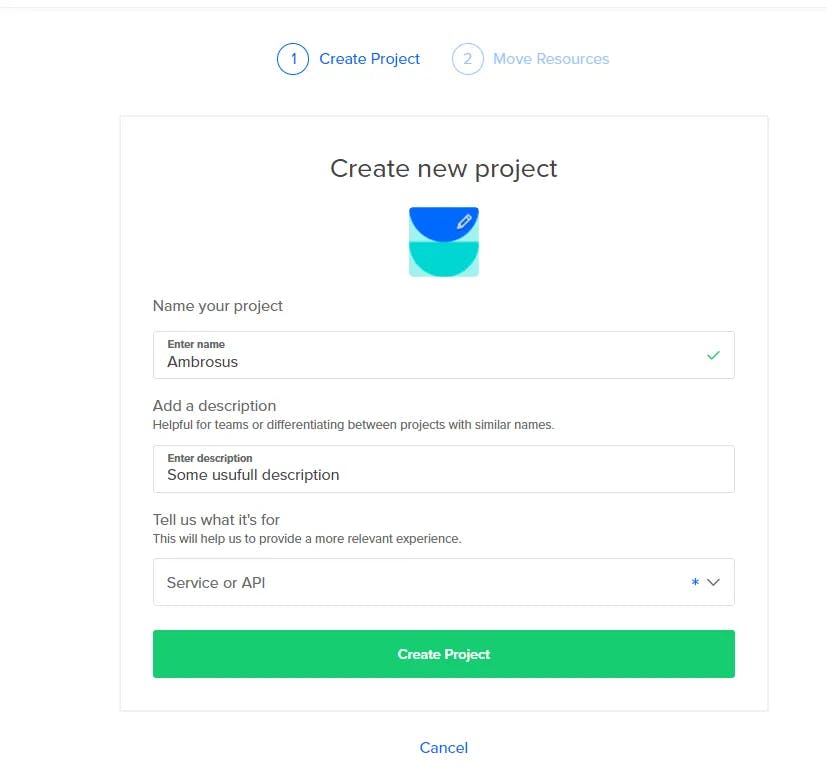
To start, initiate the process by establishing an account on DigitalOcean. After successful registration, login and create a “New project,” giving it a suitable name.
When prompted to specify the type, opt for “Service or API.” If there’s an inquiry regarding relocating resources, kindly disregard it.
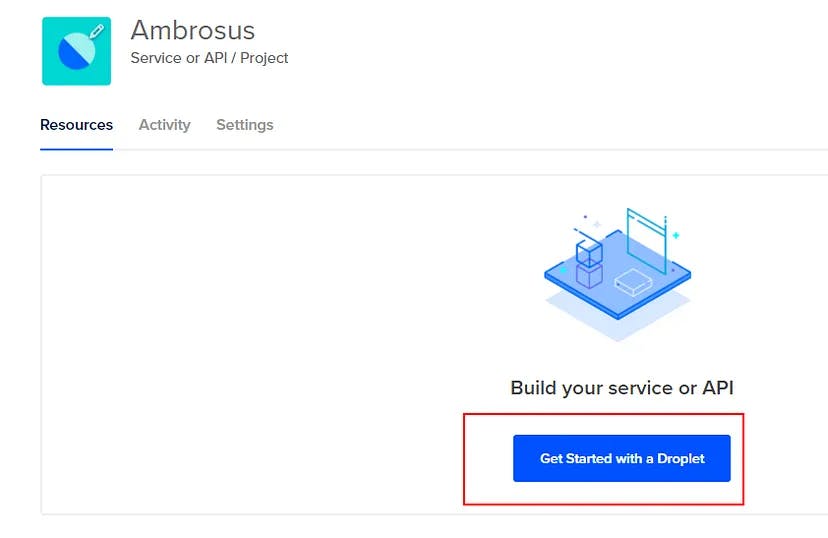
Now, navigate to your freshly created project. With this project in place, it’s time to introduce our VPS server, which DigitalOcean calls a ‘Droplet.’
Access the ‘Create’ tab and select ‘Droplet’ from the menu atop the page. At this juncture, it’s vital to specify the configuration and details of our server.
Choose the following options:
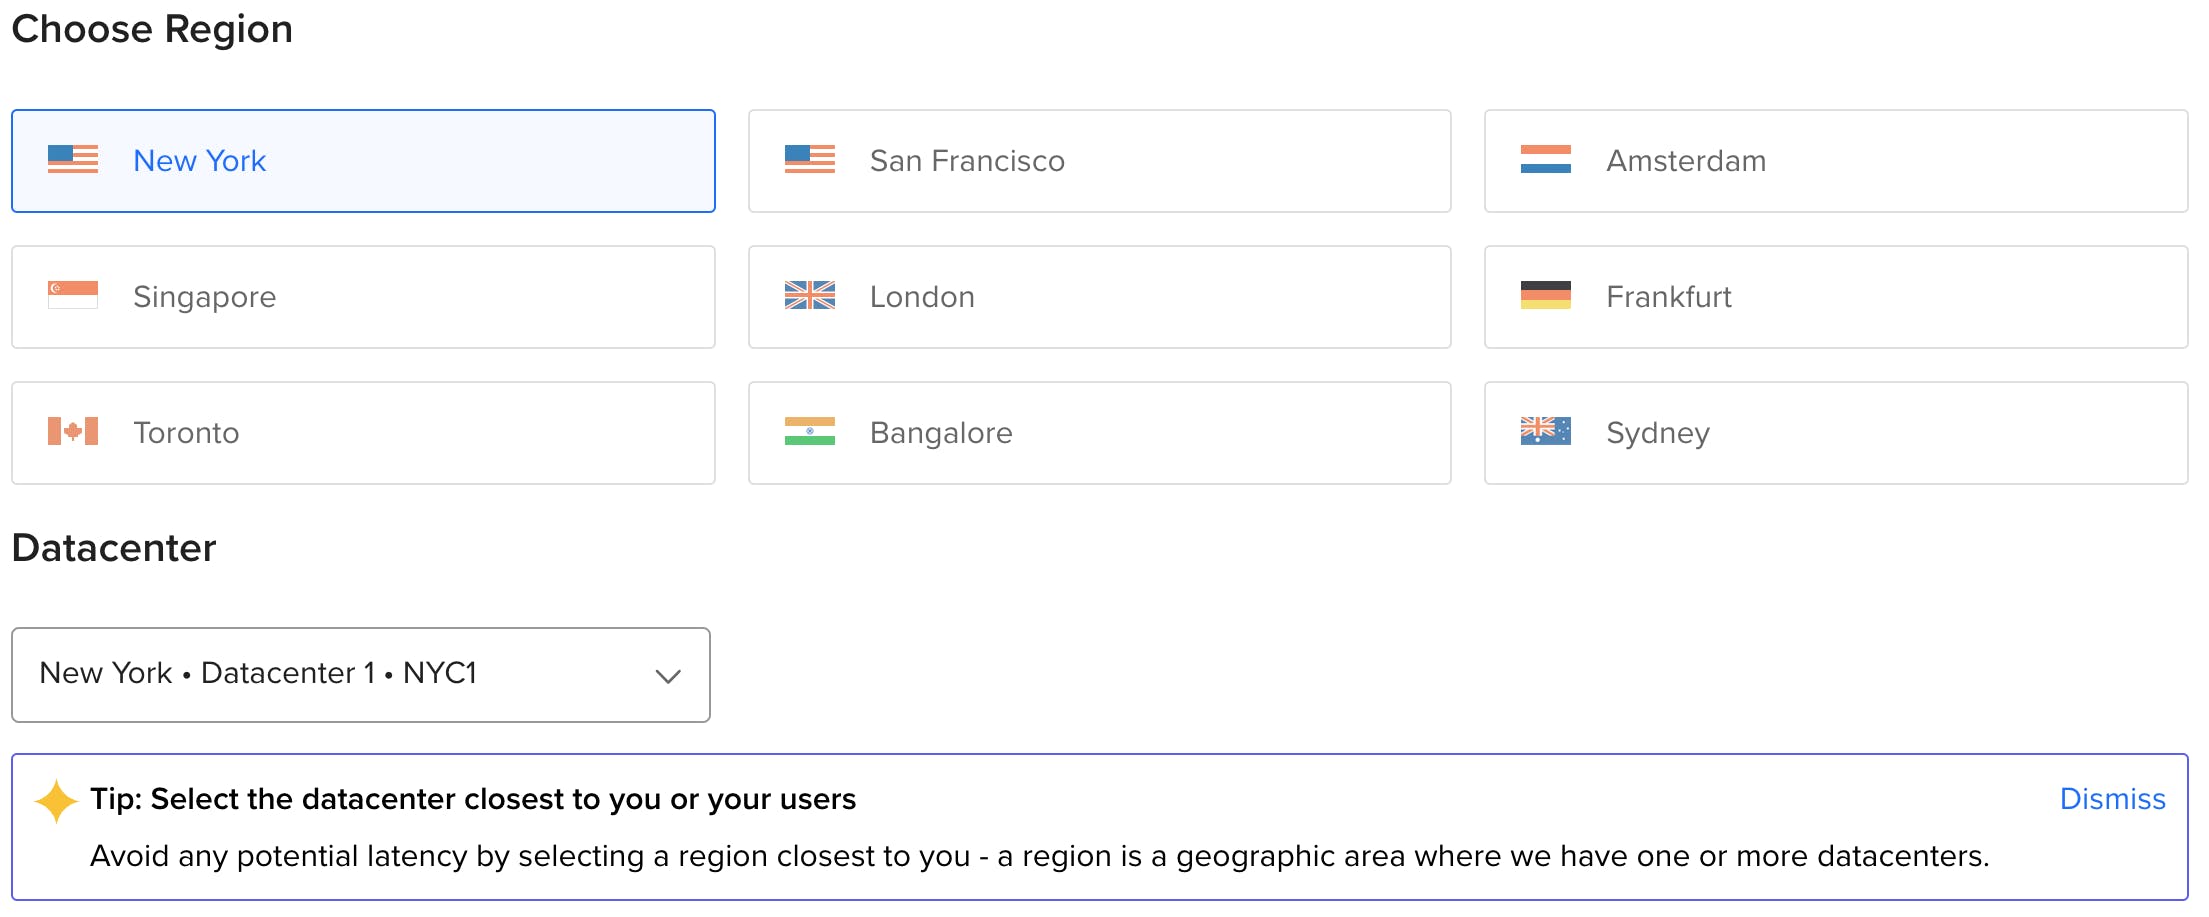
- Select any data center region — AirDAO developers suggest picking the closest server to your location;
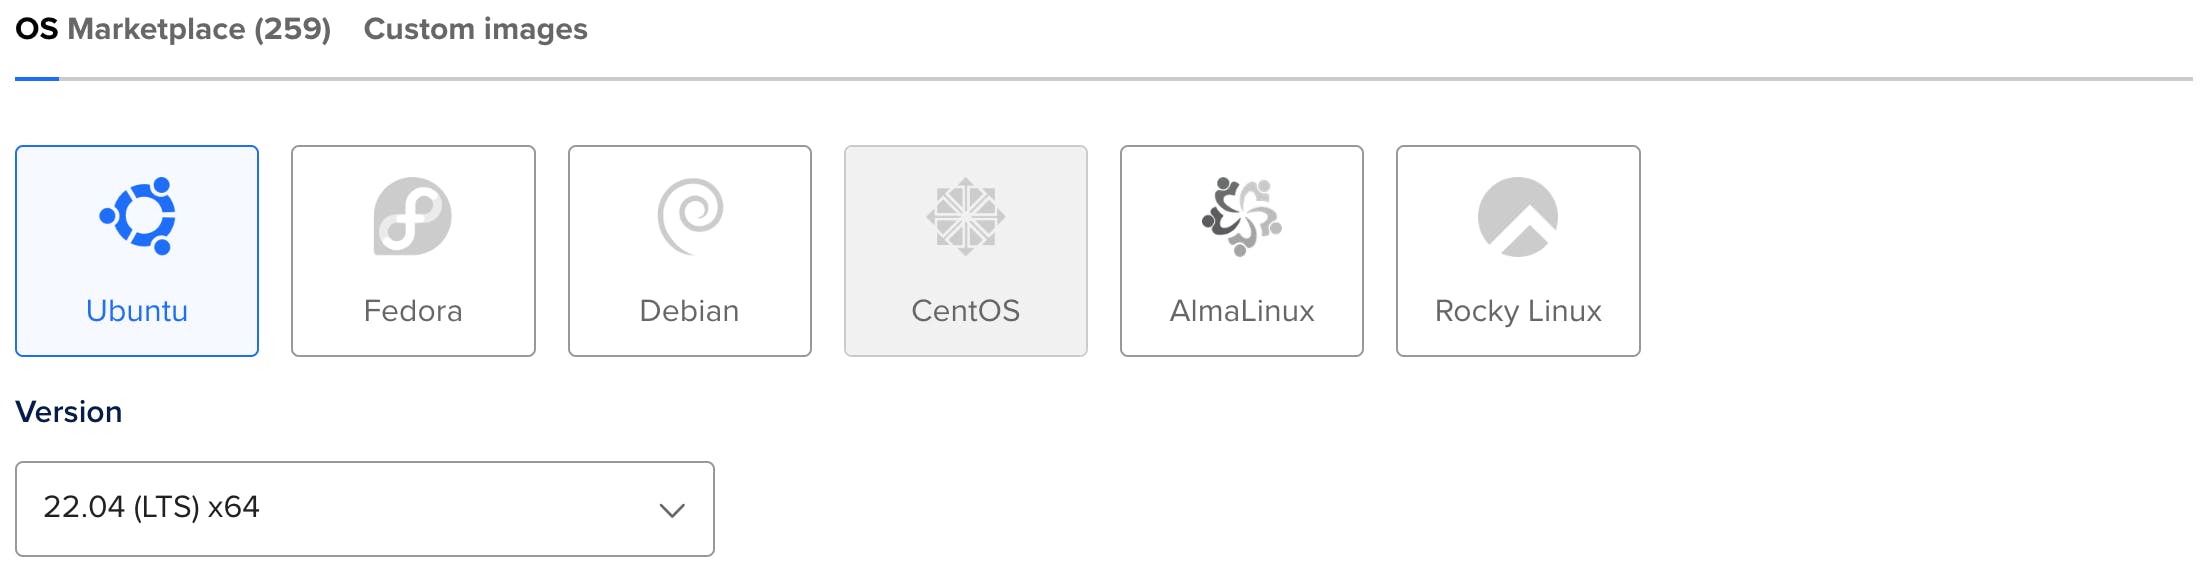
- Ubuntu 22.04 x64. Please note this operating system’s version is not selected by default;
- Basic Plan;

- CPU options — regular, $18 / month with 2 CPU / 2 GB memory / 60 GB SSD storage;

- Additional storage — skip;
- Add and select your SSH key or set up a password (it is recommended to add SSH key to increase security);

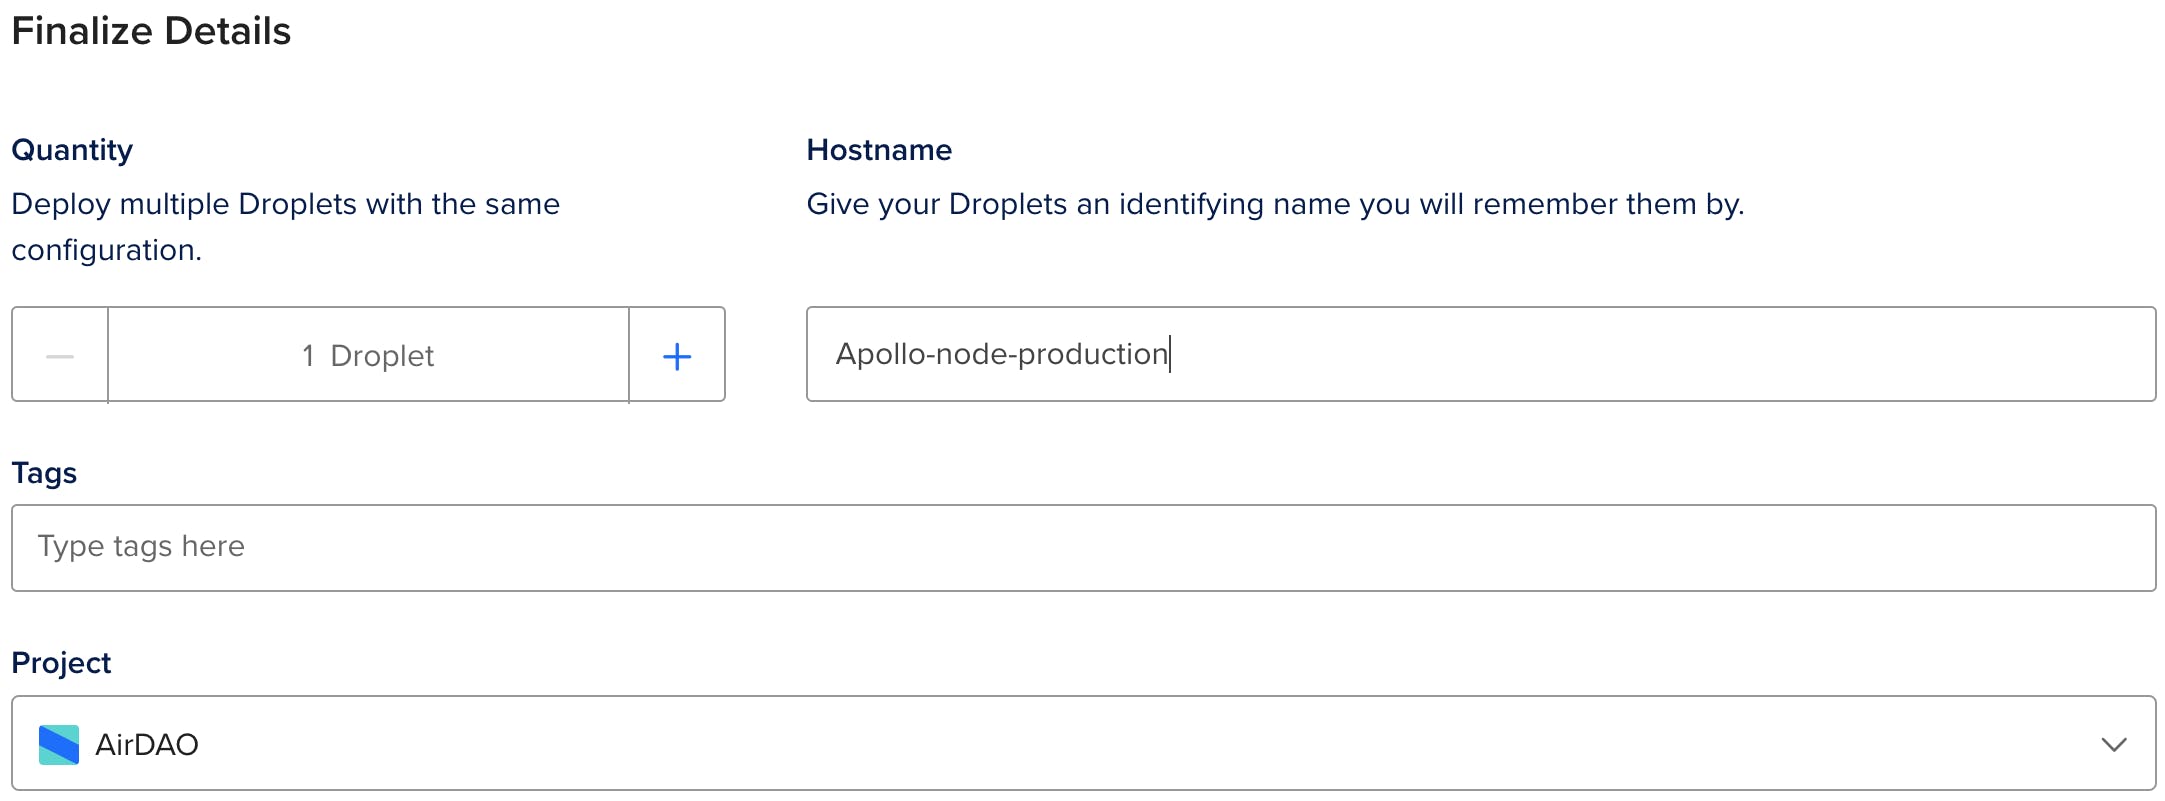
- Name the droplet and assign it to our project;
- Click “create droplet” and wait until the server starts running. You’ll be brought to another page where you can see the status of your server as it spins up.

After the server starts, it will appear in the list of available servers. Double-click on the server name to open a page with detailed information about the VPS server. In the upper right corner, click the “Console” button to open the command line.
Step 6. Run the node setup
Follow these steps for node installation:
- Begin by pasting the command mentioned at the end of the initial part of this guide into the Command Prompt (CMD) to commence the node installation process.
(source <(curl -s https://raw.githubusercontent.com/ascendia-network/airdao-nop/master/setup.sh)
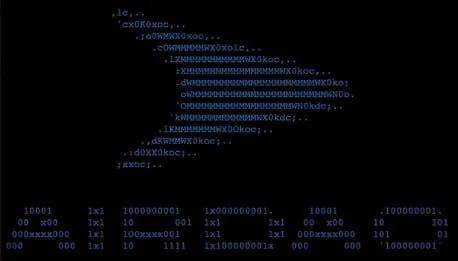
- Once the installation process concludes, with the latest updates installed, you’ll observe the AirDAO logo displayed on the command line.
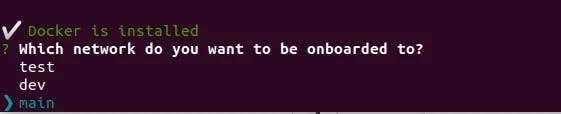
- The next prompt will ask you to select the network you wish to operate on, and you should choose ‘main.’
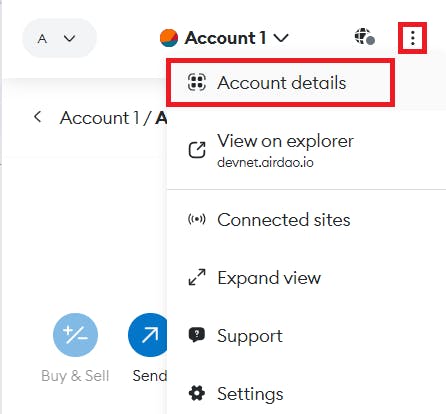
- Subsequently, you’ll be prompted to input the private key or generate a new key automatically. Pick the first option and use the key associated with the address where the node is currently active. You can find this key in your MetaMask wallet. Go to Account details by clicking on the three dots adjacent to your account name.
- After the key is accepted, you must specify the node’s IP in agreement with the VPS server address, which is automatically determined.
This concludes the node launch process. Await a notification confirming a successful launch and a message indicating the time until the node becomes operational. This time frame signifies the minimum duration the node must be online for a successful launch.
Congratulations, you’re officially an AirDAO node operator!


